
")
How To Grow Cannabis Seedlings in Coco Coir
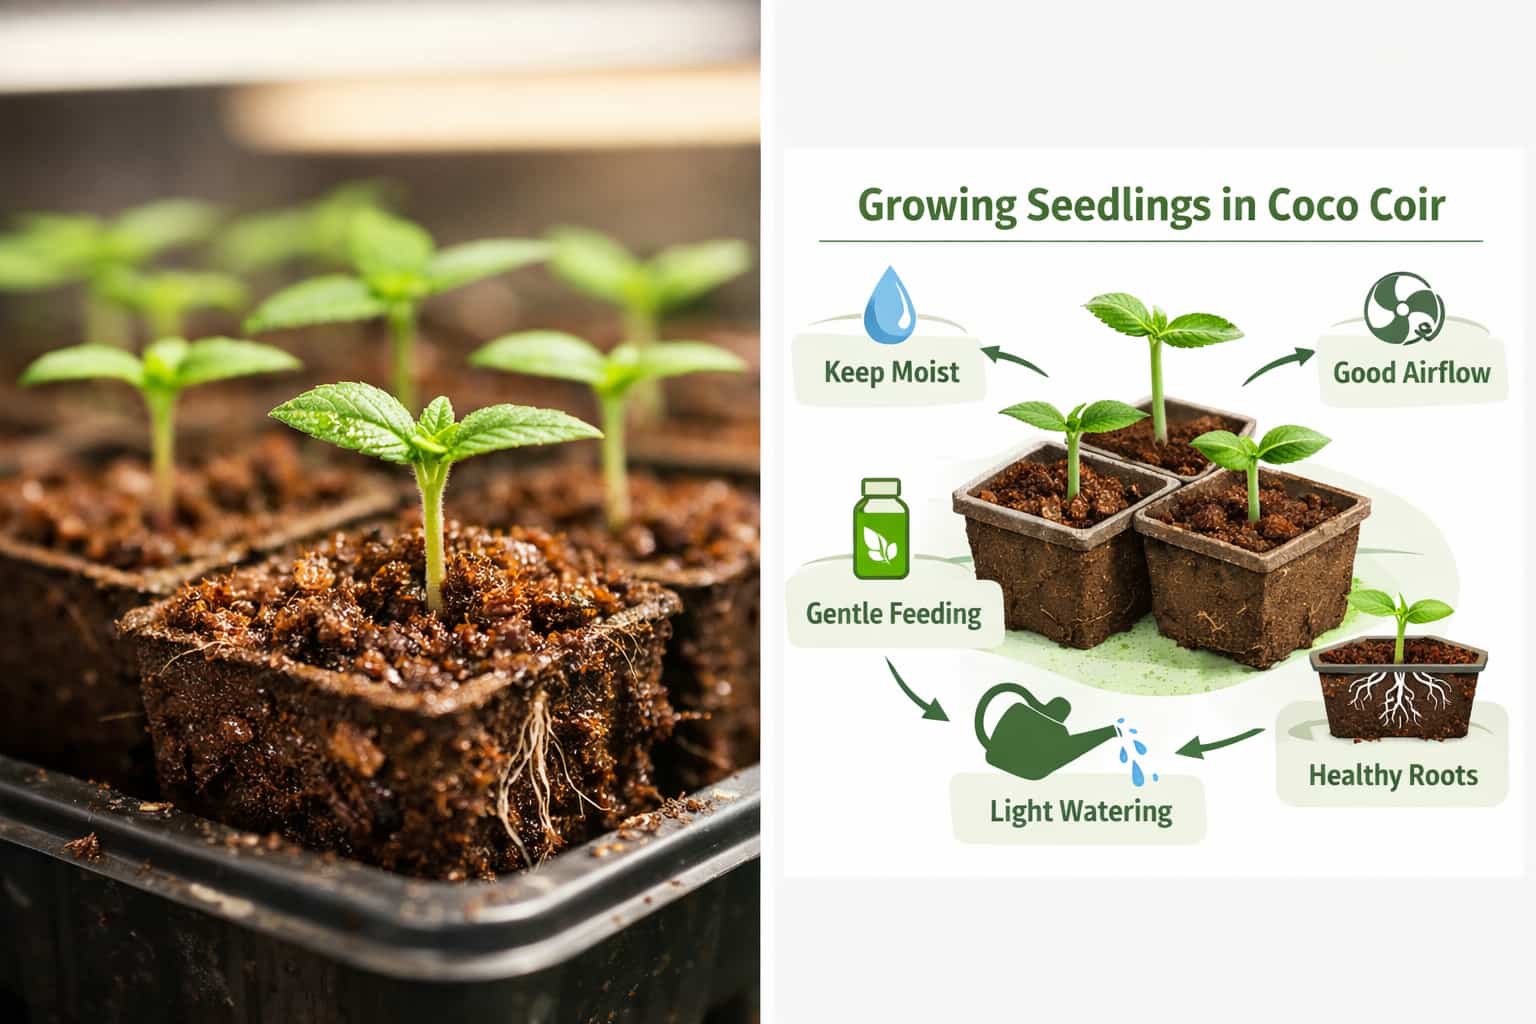
Coco coir is one of the most popular ways to raise strong, fast-rooting cannabis seedlings. It holds moisture well while staying airy—so roots can breathe. The trade-off is that coco is a “soilless” medium: you’ll typically feed nutrients earlier than you would in soil, and you’ll want to stay consistent with pH and EC (nutrient strength).
This guide walks you step-by-step through preparing coco, starting seedlings, dialing in watering and lighting, and fixing the most common early issues—so your plants transition cleanly into vegetative growth.
- Why coco coir works so well for seedlings
- Choosing the right coco (rinsed vs buffered)
- Best coco mix for seedlings
- How to start seedlings in coco (two simple methods)
- Seedling pH + EC targets (easy ranges)
- How to water seedlings in coco (without overdoing it)
- Lighting for coco seedlings (PPFD + schedule)
- Temperature, humidity, and airflow
- Troubleshooting common seedling problems
- When to transplant (and how to avoid shock)
- FAQs
Why Coco Coir Works So Well for Seedlings
Coco coir is prized because it balances water retention with oxygen. That’s perfect for seedlings, where your #1 goal is building a healthy root zone quickly. When roots get oxygen, they grow faster and explore more of the pot—setting you up for stronger plants later.
Coco is also consistent and clean compared with many bagged soils, which can vary in nutrient charge and drainage. The main thing to remember: Coco isn’t “food.” You provide nutrition through your feed solution.
Helpful internal reading: If you’re also selecting genetics and planning the full run, check How to Grow Autoflower Seeds (Complete Indoor & Outdoor Guide) and the main hub at Secret Garden Seed Bank Blog.
Choosing the Right Coco: Rinsed vs Buffered
Not all coco is equal. High-quality coco is typically washed/rinsed to reduce salts and often buffered with calcium and magnesium. Buffering matters because coco can hold onto certain positively charged ions (cations). If it’s not buffered well, you can see early calcium/magnesium issues.
What to look for on the bag
- Pre-rinsed / low-salt (lower starting EC)
- Pre-buffered (often mentions Ca/Mg buffering)
- Clean, uniform texture (not overly dusty or full of large chunks)
If your coco is NOT pre-buffered (simple approach)
If you suspect your coco isn’t buffered, you can “pre-charge” it by hydrating it with a light nutrient solution that includes a Cal-Mag supplement. This helps stabilize the medium before the seedling relies on it heavily.
Best Coco Mix for Seedlings
For seedlings, you want coco to drain freely while staying evenly moist. Two beginner-friendly mixes:
- 70/30 coco/perlite (classic, very forgiving)
- 60/40 coco/perlite (extra airy if you tend to overwater)
If you’re using straight coco, it can still work—but the margin for overwatering is smaller in larger containers.
How to Start Seedlings in Coco (Two Simple Methods)
Method A: Germinate first, then plant into coco
- Pre-moisten your coco mix until it’s evenly damp (not dripping).
- Fill a small starter pot/cup and lightly settle (don’t pack it tight).
- Plant the seed about 1–1.5 cm deep.
- Mist or lightly water the top area to keep it moist until it breaks the surface.
Method B: Start in a small plug, then move into coco
- Start the seed in a small starter plug.
- Once you see roots (or the seedling stands strong), place the plug into pre-moistened coco.
- Water lightly around the plug to “marry” it to the surrounding coco.
Seedling pH + EC Targets in Coco (Easy Ranges)
Coco behaves more like hydro than soil, so most growers run a slightly lower pH than they would in soil. A common, beginner-friendly target is pH ~5.8–6.2.
For nutrient strength, start gentle. Seedlings don’t need a heavy feed—especially in the first 7–14 days. If you measure EC, aim for a light feed and increase gradually as the plant “asks” for more.
- pH (coco): ~5.8–6.2
- EC: start light, increase gradually as growth accelerates
- Cal-Mag: often helpful in coco, especially early
If you want a broader grow plan beyond seedlings, see How to Grow Autoflower Seeds (Complete Indoor & Outdoor Guide) (it includes a helpful pH section for coco/hydro).
How to Water Cannabis Seedlings in Coco (Without Overdoing It)
Coco seedlings usually do best with consistent moisture (not soggy, not bone dry). The goal is to keep the root zone oxygenated while delivering fresh nutrient solution regularly.
Beginner watering rhythm
- Water small amounts in a ring around the seedling at first.
- As roots expand, water more evenly through the pot.
- In drain-to-waste coco growing, many growers water until a bit of runoff appears to help prevent salt buildup.
Runoff tip: Runoff is a useful habit in coco once the seedling is established and the pot is being watered more fully. In very small starter cups, keep it modest—just avoid chronic saturation.
Lighting for Coco Seedlings (PPFD + Schedule)
Seedlings want gentle light at first—enough to prevent stretching, but not so intense that the leaves curl, bleach, or dry out too quickly. A practical “home grow” range for seedlings/early veg is roughly ~100–300 PPFD.
Many indoor growers use 18/6 or 20/4 during the seedling stage. The best schedule is the one that keeps your environment stable (temperature and humidity swings cause more problems than the exact schedule).
For a deeper breakdown of PPFD, DLI, and how to dial in a fixture, link readers to: Best Lights for Growing Cannabis: LED vs HPS, PPFD Targets, Coverage & How to Choose.
Temperature, Humidity, and Airflow
Seedlings like stable conditions. Aim for warm (not hot) temperatures, moderate-to-high humidity, and gentle airflow that strengthens stems.
- Temperature: keep it comfortably warm and stable (avoid big swings).
- Humidity: seedlings often do well in a moderately humid environment.
- Airflow: gentle, constant movement helps prevent weak stems and reduces disease risk.
If you want a simple baseline that many home growers follow across stages, this guide includes practical environmental targets: How to Grow Autoflower Seeds (Complete Indoor & Outdoor Guide).
Troubleshooting Common Seedling Problems in Coco
1) Stretching (tall, weak seedling)
- Likely cause: light is too weak or too far away.
- Fix: increase light intensity gradually (or lower the light slightly), and keep a gentle fan on the seedling.
2) Droopy seedling (especially in a large pot)
- Likely cause: root zone staying too wet for too long.
- Fix: let the pot dry back a bit more between irrigations, increase airflow, and consider a lighter coco/perlite mix.
3) Pale new growth or rusty spotting (early Cal/Mag-style symptoms)
- Likely cause: coco chemistry + feeding imbalance, especially if the medium wasn’t fully buffered or your feed is very light.
- Fix: keep pH steady, ensure a gentle base nutrient is present, and add Cal-Mag if needed—then watch new growth over the next few days.
4) Burnt tips
- Likely cause: nutrient strength too high or salts building up.
- Fix: reduce feed strength and ensure you get some runoff when watering more fully.
5) “Damping off” (seedling collapses at the stem)
- Likely cause: too wet + stagnant air + contaminated conditions.
- Fix: improve airflow, avoid keeping the surface constantly soaked, and keep tools/containers clean.
When to Transplant (and How to Avoid Shock)
Transplant when the seedling has a stable stem, several true leaf sets, and roots that have clearly occupied the starter container. The key is to transplant before the root zone becomes cramped—but after the plant is strong enough to handle a move.
Low-stress transplant steps
- Pre-moisten the new coco mix (light feed, correct pH).
- Transplant gently without breaking apart the root ball.
- Water in lightly to settle coco around the roots.
- Keep light intensity moderate for 24–48 hours, then ramp up again.
Planning to train later? You can link readers to canopy strategies like How to SCROG Cannabis Plants (Screen of Green) once plants are established and vigorous.
FAQs
Do I need to flush coco before I start?
If your coco is reputable and labeled rinsed/low-salt, you can usually start by hydrating it with a light, balanced feed. If the coco seems “hot” (salty) or unknown, rinsing and/or buffering can prevent early issues.
Should seedlings in coco get nutrients right away?
Many growers provide a very light feed early in coco because it’s not a nutrient-rich medium. Start gentle and increase gradually as growth speeds up.
How often should I water seedlings in coco?
It depends on container size, airflow, and temperature. The safest approach is to keep moisture consistent without saturating the whole pot early. As the root zone fills in, coco often performs best with more regular irrigations and some runoff.
What’s the best next step after seedlings?
Once the plant is established, you’ll increase light intensity and feeding as it enters vegetative growth. For a full-cycle roadmap, see: How to Grow Autoflower Seeds (Complete Indoor & Outdoor Guide).
Further Reading (Internal Links)
- Secret Garden Seed Bank Blog
- Best Lights for Growing Cannabis (PPFD/DLI Guide)
- How to Grow Autoflower Seeds (Complete Guide)
- Sativa vs Indica vs Hybrid (Strain Guide)
- How To Dry Buds Without Hanging (Harvest Quality Guide)
Educational disclaimer: This article is for informational purposes only. Always follow local laws and regulations where you live.
Legal Disclaimer: Cannabis laws vary by jurisdiction. It is the buyer’s responsibility to know and follow all local, provincial/state, and federal laws. These products are intended for adult customers (18+ or as required by law) where permitted. We do not encourage or promote any illegal activity.